


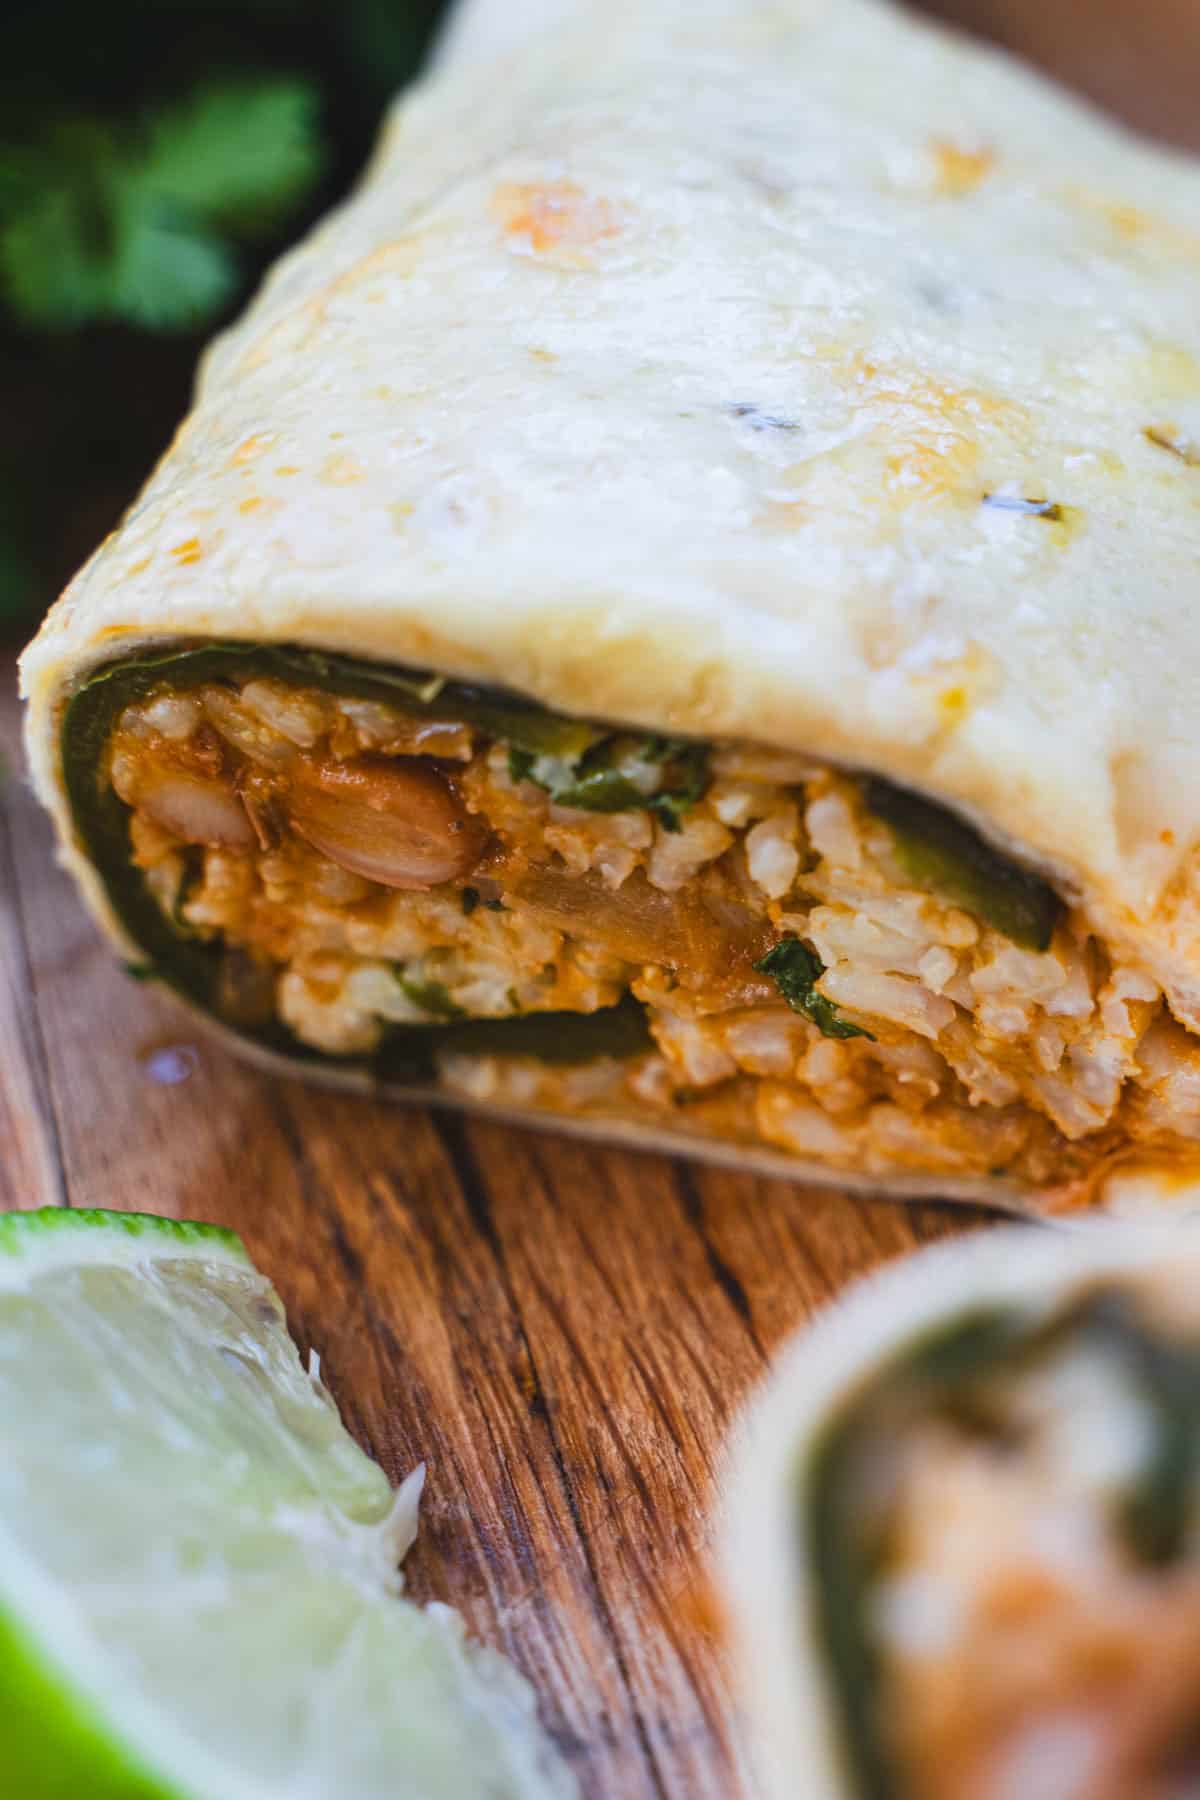
This baked burrito is everything you want in a easy mexican Dinner for Two recipe-a smoky, cheesy chile relleno burrito wrapped up with a flavorful bean and rice burrito filling. It delivers all the comfort of a restaurant favorite without the fuss of batter and frying. If you've ever wished you didn't have to choose between a burrito and chile relleno, this is your answer.
Here's the thing-traditional chile rellenos are one of those dishes I almost never make at home. They're delicious, but between the battering and frying, it's just not a "Tuesday night for two" kind of recipe. What I really crave is that smoky roasted chile, stuffed with melty cheese, the kind you eat with a fork and knife-and somehow, I wanted to tuck that experience into a burrito. This recipe solves that perfectly. By roasting the chile instead of frying it and folding it into a hearty bean and rice filling, you get all that rich, comforting flavor in a way that's doable, balanced, and just the right size for two.
The Inspiration (and My Twist)
This recipe is inspired by the baked burrito method from America's Test Kitchen , which leans into building deep flavor and finishing burritos in the oven for that golden, melty top.
But the spark for the chile relleno part of this story came from a visit to see my son in Washington, DC. We walked to his neighborhood spot, Taqueria Habanero-one of those places you're lucky to have just steps from your apartment (I love that about DC). I ordered a chile relleno and pork burrito, and it was everything I hoped for, smoky, cheesy, and absolutely a fork-and-knife situation.
That meal stuck with me-but I also knew I wanted to create a version that felt a little lighter and more weeknight-friendly, and in this case, vegetarian. Skipping the pork and letting the roasted chile take center stage felt like the right move.
So when I came back to my own kitchen, I kept those flavors but changed the approach. No frying, no battering-just roasted chiles, melty cheese, and a savory bean and rice filling, all folded into a burrito that delivers that same comforting experience in a way that's simple, satisfying, and perfectly scaled for a dinner for two.
What Makes This Chile Relleno Burrito Work
This is one of those recipes where a few small "aha" moments make all the difference.
- First, the chile. Instead of frying (which, let's be honest, is why I never make chile rellenos at home), I roast the Anaheim chile until it's smoky and blistered. But here's the little upgrade-I don't stop there. I let it simmer in seasoned broth for a few minutes so it turns extra tender and picks up even more flavor. That step is what takes it from "roasted pepper" to "this actually feels like a chile relleno."
- Then there are the beans. Rather than leaving them whole, I mash some of the pinto beans with a bit of broth. Not all of them-just enough to create a creamy base that holds everything together. It's the difference between a burrito that falls apart and one that feels rich and cohesive in every bite.
- The rice pulls its weight too. Cooking it in broth instead of water and finishing it with a little cilantro gives it flavor on its own, instead of just being filler.
- And the cheese-Monterey Jack is the quiet hero here. It melts smoothly into the filling and then again on top when the burritos hit the oven, giving you that gooey, golden finish without overpowering everything else.
Finally, it all comes together with a quick sauté of onion, tomato paste, garlic, and spices. It doesn't take long, but it builds that deep, savory base that makes the whole burrito taste like more than the sum of its parts.
The end result? Everything melds together-smoky chile, creamy beans, fluffy rice, melty cheese-so when you cut into it, it actually holds together like a proper baked burrito, not a pile of separate fillings.
Jump to:

Baked Burrito Ingredient Notes (and Smart Swaps)
Let's talk ingredients-because each one is doing a little bit of work here, and a few small choices make a big difference in how these baked burritos turn out.
- Chile Peppers - Anaheim peppers are my go-to here-they're mild, slightly sweet, and roast beautifully. You get that signature chile relleno vibe without overwhelming heat, which makes this perfect for a cozy dinner for two.
- Smart swaps: If you want a little more depth, poblano peppers are a great swap-they bring a slightly smokier, richer flavor. And if peppers are looking a little sad at the store? Even a bell pepper will work. You'll lose the heat, but you'll still get that soft, roasted, slightly sweet bite tucked into the burrito.
- Beans - Pinto beans are classic burrito territory, and they really shine here. And I'll be honest-canned pinto beans are my go-to. It's a total time-saver for a dinner for two, and they work beautifully in this recipe. Just make sure to rinse and drain them well before adding them to your filling base so you're not bringing in any extra liquid.
- Smart Swaps: Black beans work too-they're a bit firmer and slightly earthier, so it just depends on your mood.
- Rice - Cooking long-grain white rice in broth instead of water is a simple upgrade that adds flavor right from the start. A handful of chopped cilantro and a squeeze of lime at the end wakes everything up and keeps the filling from feeling too heavy.
- Cheese - Monterey Jack is the quiet overachiever in this recipe. It melts smoothly into the filling, then again over the top when the burritos bake, giving you that gooey, golden finish without stealing the spotlight.
- Smart swaps: Mozzarella works in a pinch (we've all been there), but if you can, skip the pre-shredded cheese. It's coated to prevent clumping, which also means it doesn't melt quite as beautifully. And in a recipe like this, that melty texture is kind of the whole point.
Note: You will find the measurements and other helpful ingredient tips in the recipe card below.
How to make Baked Chili Relleno Burrito
Step 1: Roast the Chile Peppers
Let's start with the part that gives this whole burrito its smoky, chile relleno personality.
Move your oven rack so it's about 6 inches below the broiler and let it preheat. Line a baking sheet with foil-trust me, this is one of those you'll thank yourself later steps when cleanup takes two seconds.
Slice your Anaheim peppers in half lengthwise, keeping the stems intact (they make them easier to handle), and remove the seeds.
Once they're out of the oven, let them cool just enough to handle. Then trim off the stems and gently peel away any loose skin. Don't stress about getting every last bit-just remove what slips off easily and call it good. That's all you need to get that classic roasted chile flavor without any fuss.
Step 2 | Cook the Rice
This is not just "rice on the side" rice-this is the kind that actually matters in the burrito.
Start by rinsing your rice under cold water until the water runs mostly clear. It feels like a small step, but it makes a big difference-it removes excess starch so the rice cooks up fluffy instead of sticky or gummy.

In a small saucepan, combine the rinsed rice with broth. I like to use a shortcut here: Better Than Bouillon (about 1 teaspoon per 1 cup of water). It saves you from opening a full carton of broth with no immediate plan for the rest of it-which, let's be honest, happens more often than we admit.
Add a couple of minced garlic cloves and a pinch of salt, then bring everything to a boil over medium-high heat.
Once it's boiling, cover the pot, reduce the heat to low, and let it cook gently until the rice is tender and the liquid is absorbed-about 20 minutes. When it's done, take it off the heat and let it sit, still covered, for about 10 minutes. This little resting step lets it finish steaming and makes it extra fluffy.
Right before you use it, fluff the rice with a fork and stir in chopped cilantro and a splash of rice vinegar (or lime juice if that's more your style). Then cover it back up to keep warm while you finish everything else.
Step 3 | Pinto Bean Burrito Filling
Meanwhile, let's build the heart of this burrito-the filling that ties everything together.
Heat a little oil in a Dutch oven or heavy-bottomed large saucepan over medium heat until it starts to shimmer. Add the onion and cook until it's just beginning to brown, about 5 minutes. This is where the flavor starts to quietly build, so don't rush it.
Stir in the tomato paste, chipotle, cumin, oregano, remaining garlic, and a pinch of salt. Cook for a minute or two until everything smells fragrant and a little deeper in color-this is that "why does this already taste good?" moment.
Now add in your roasted chiles along with a splash of broth. Cover and let everything simmer gently for about 15 minutes so the chiles can get tender and soak up all that seasoned goodness.
While that's happening, grab a bowl and add your canned pinto beans (drained and rinsed). Using a potato masher, coarsely mash about half of them with a little of the remaining broth. You're not going for smooth here-just creamy enough to help the filling come together while still keeping some texture.
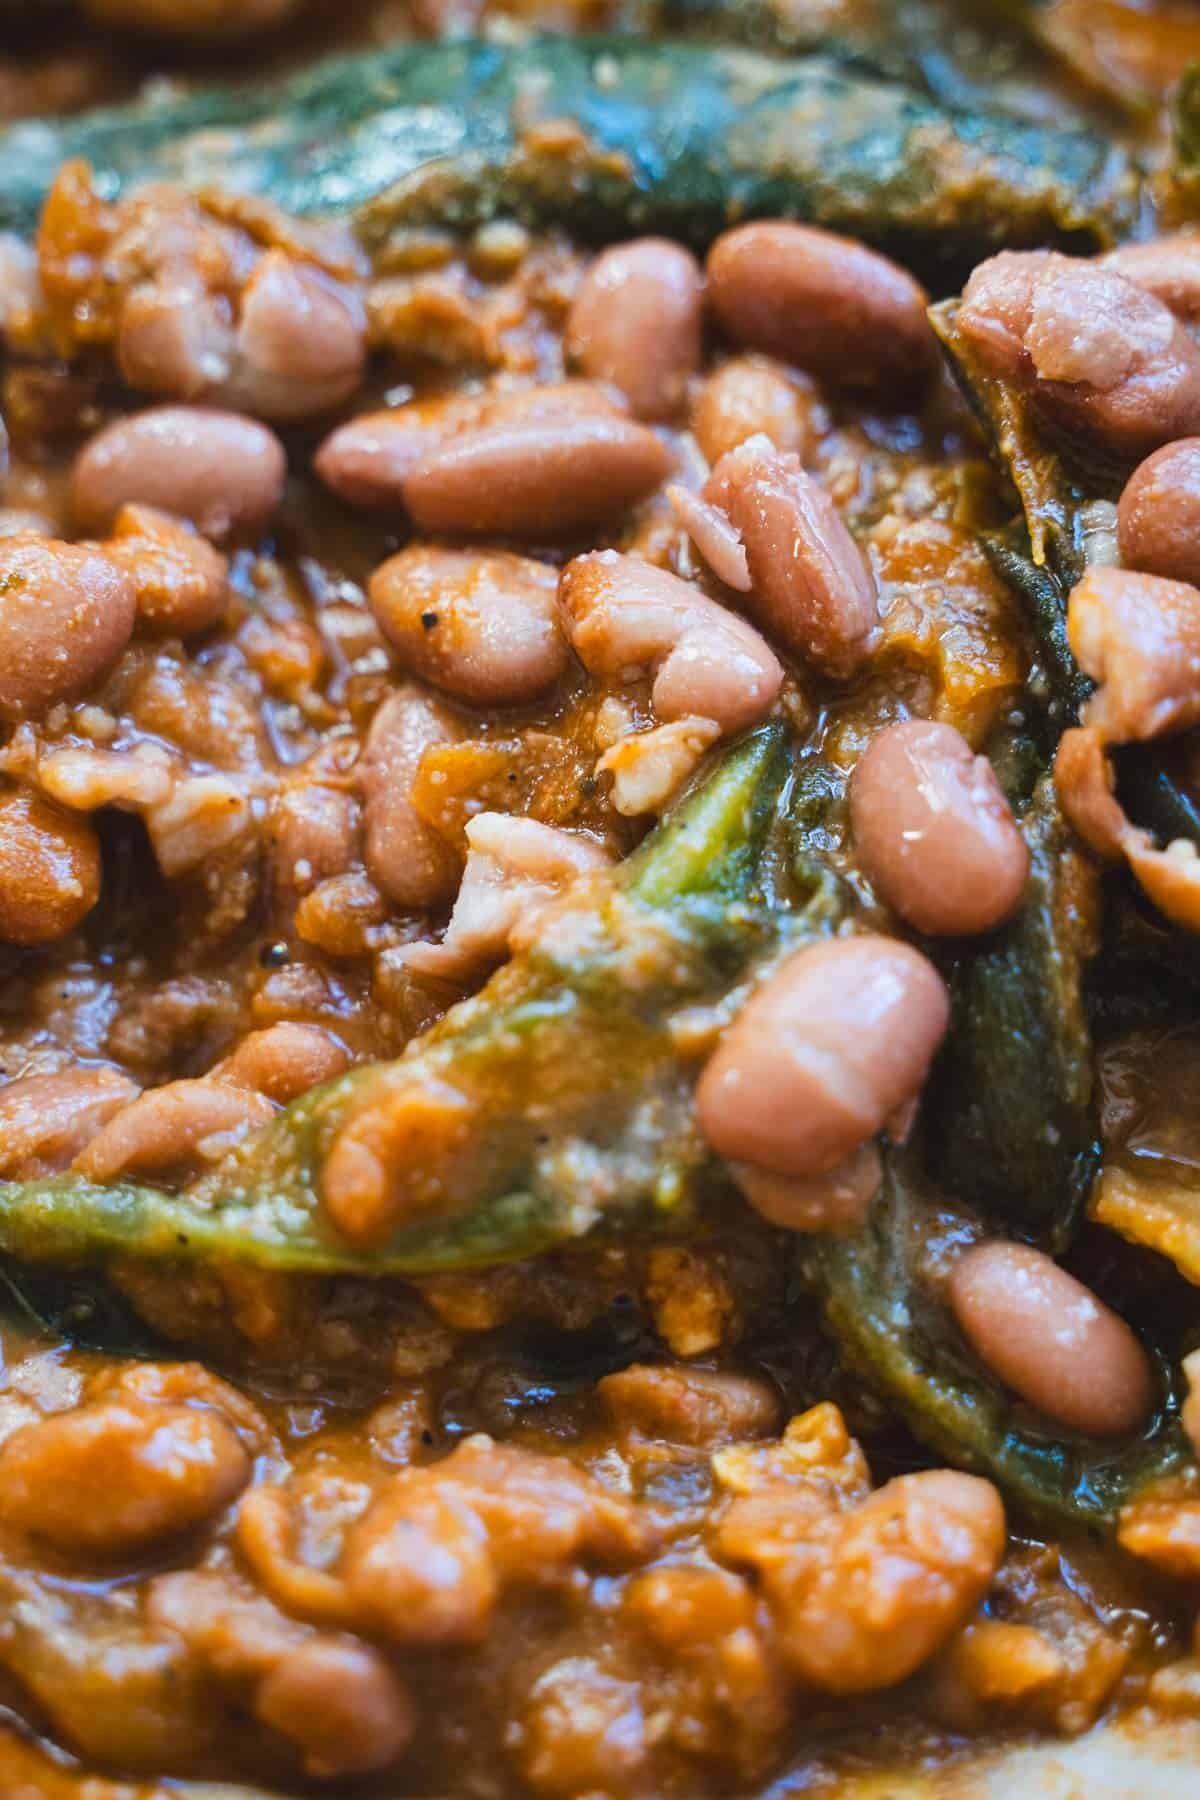
Stir the mashed beans into the pot, being gentle so you don't break up those softened chiles. Let everything cook together, stirring often, until most of the liquid has reduced-just about 3 minutes.
Turn off the heat and finish with a squeeze of lime juice, then stir in the remaining whole beans. Cover the pot to keep everything warm while you move on to assembly.
Step 4 | Fill, Fold & Bake
Adjust your oven rack so it's about 6 inches from the broiler element and turn on the broiler. This is what gives you that golden, melty, slightly crisped top that makes these feel extra special.
Wrap your tortillas in a damp dish towel and microwave them for about 1 minute, just until they're warm and pliable. This step matters more than it seems-warm tortillas are what keep everything from cracking or falling apart when you roll.
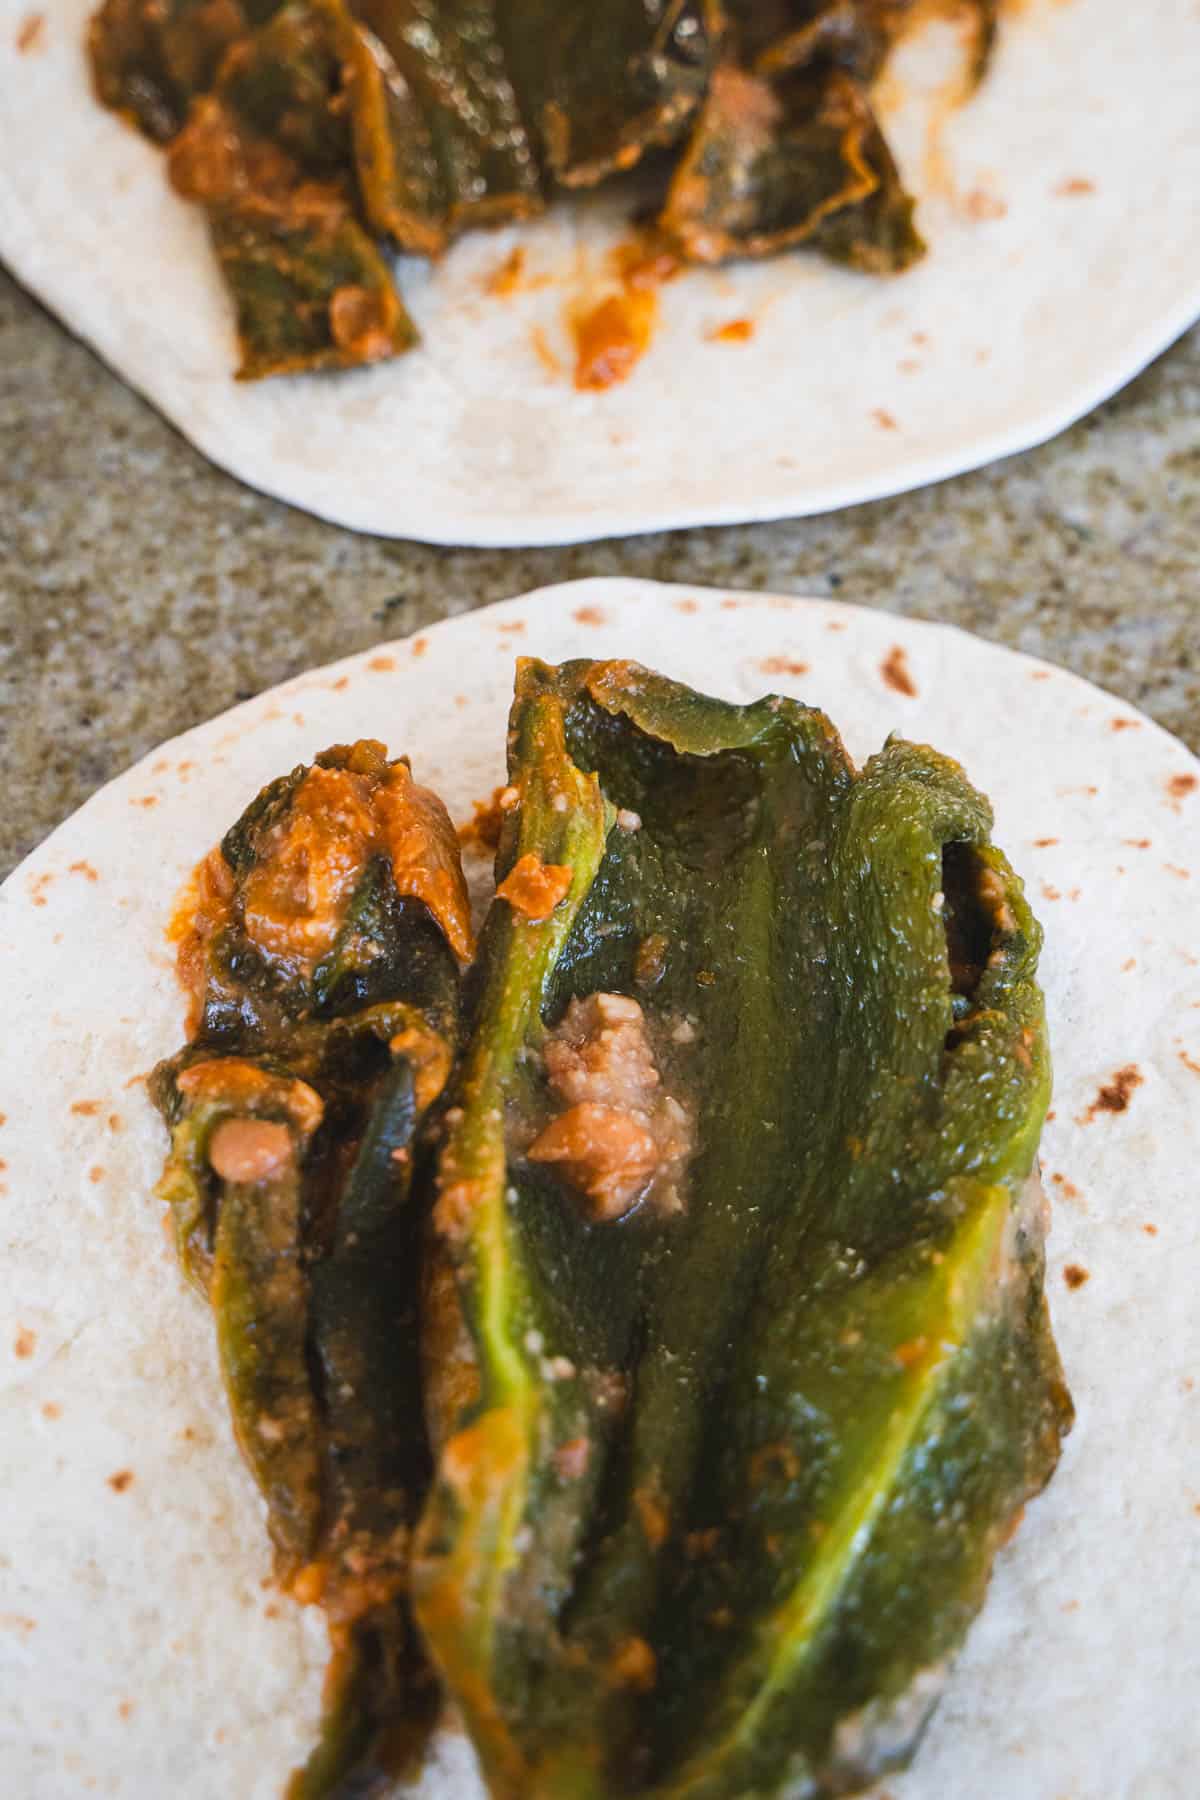
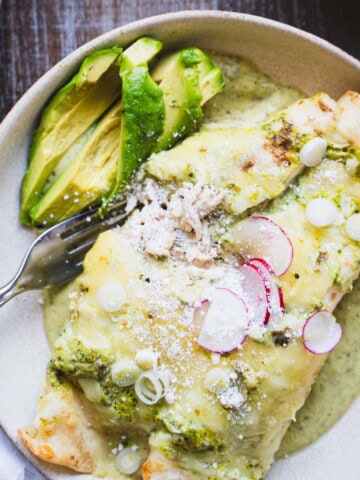
Lay the tortillas out on your counter and start building. Place your chile relleno pepper on top of each tortilla.

Spoon a mound of warm rice down the center, followed by the bean filling
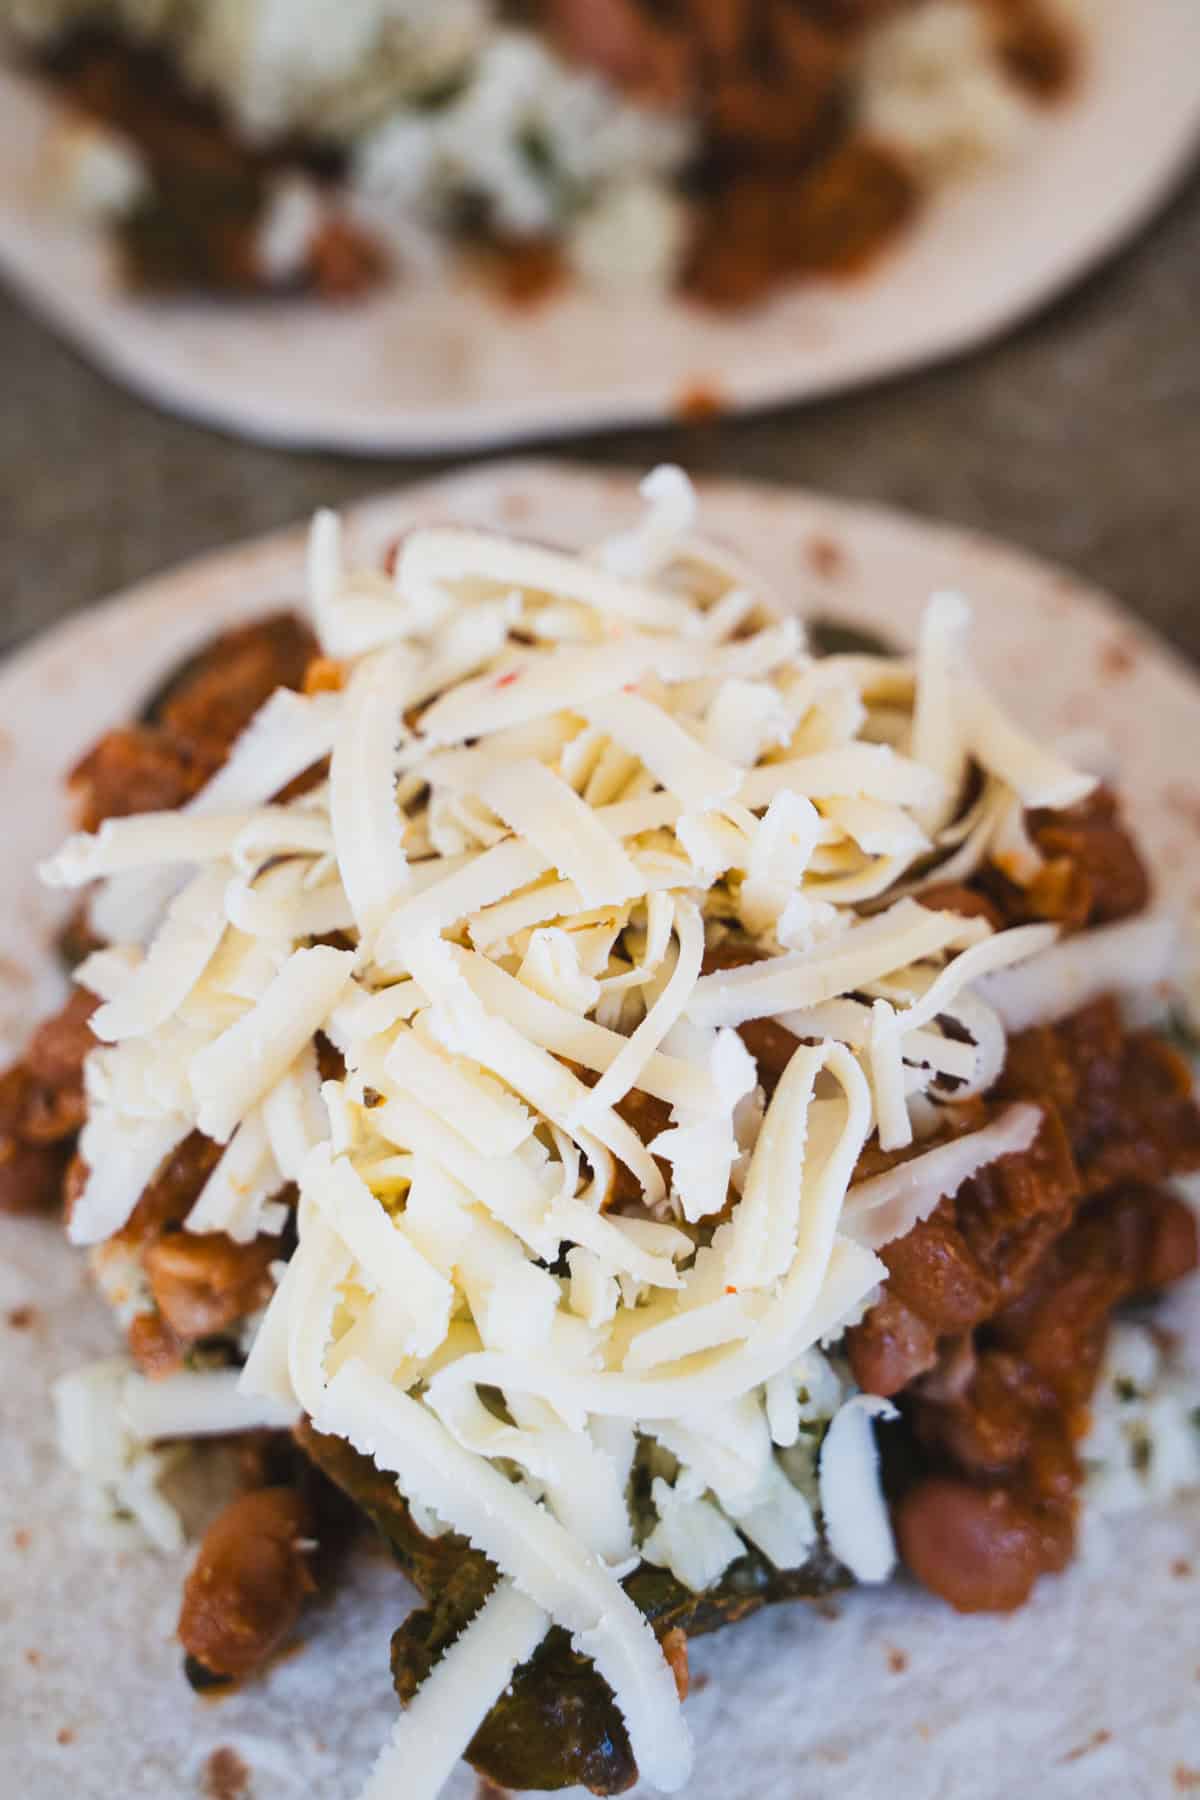
Sprinkle about ¼ cup of Monterey Jack over each one. Keep everything closer to the bottom edge so you have room to roll.
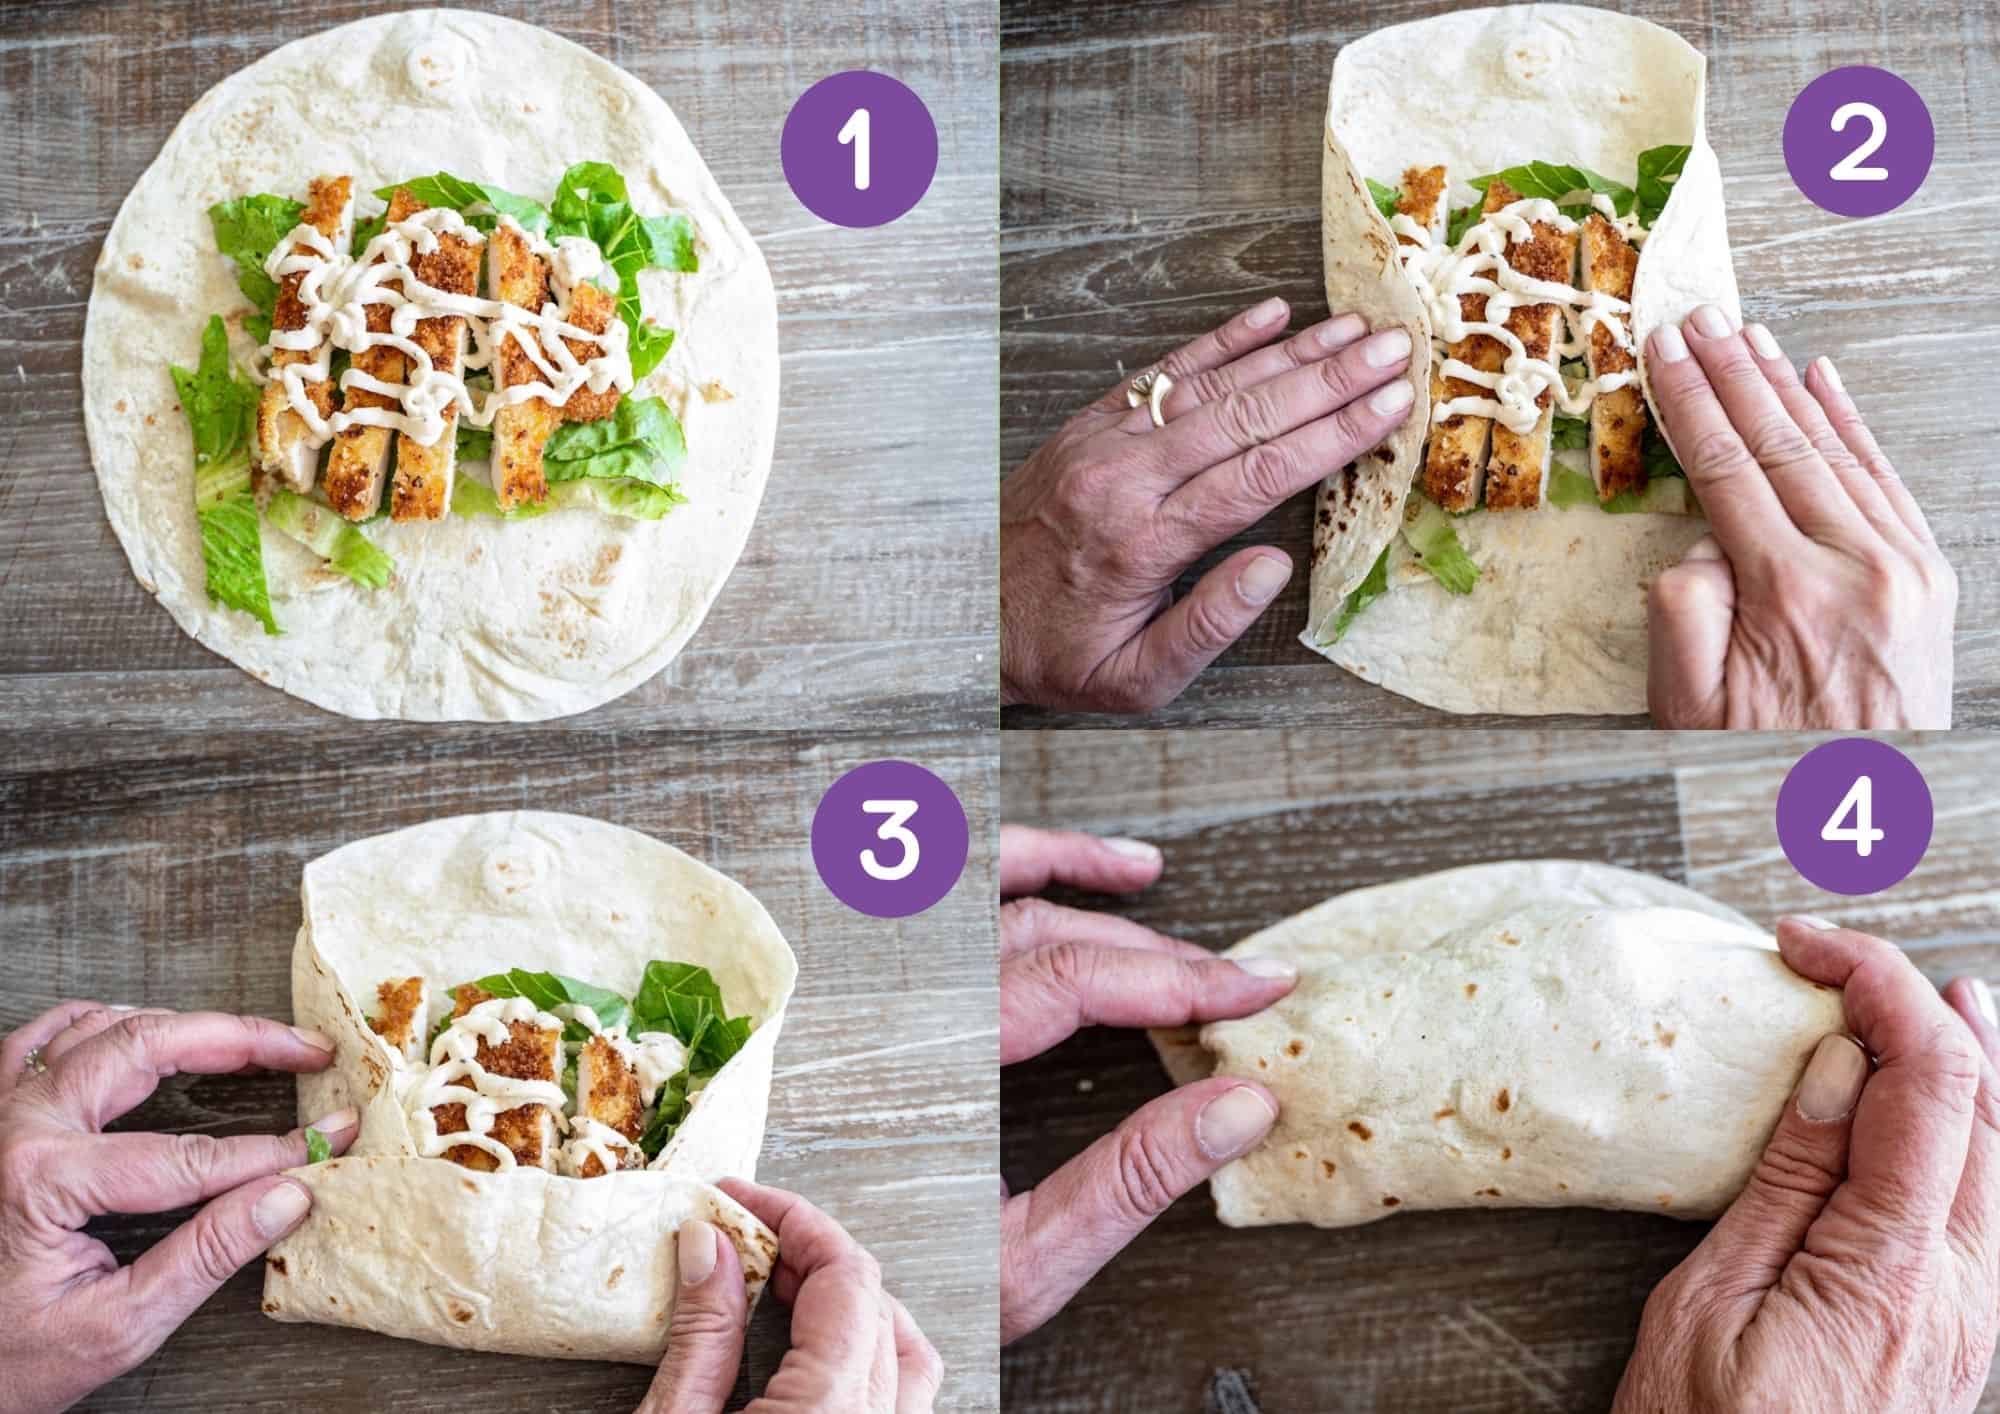
Now work one burrito at a time: Fold the sides in over the filling (photo 2 below), then bring the bottom edge up and over (photo 3 below), pulling it back slightly to snug everything in tight. Continue rolling forward, keeping it firm as you go-you want a tight burrito, not a loose wrap. (Photo 4). Note: The ingredients shown in this photo collage are for the crispy panko chicken caesar wrap - it's so good make sure to try it.
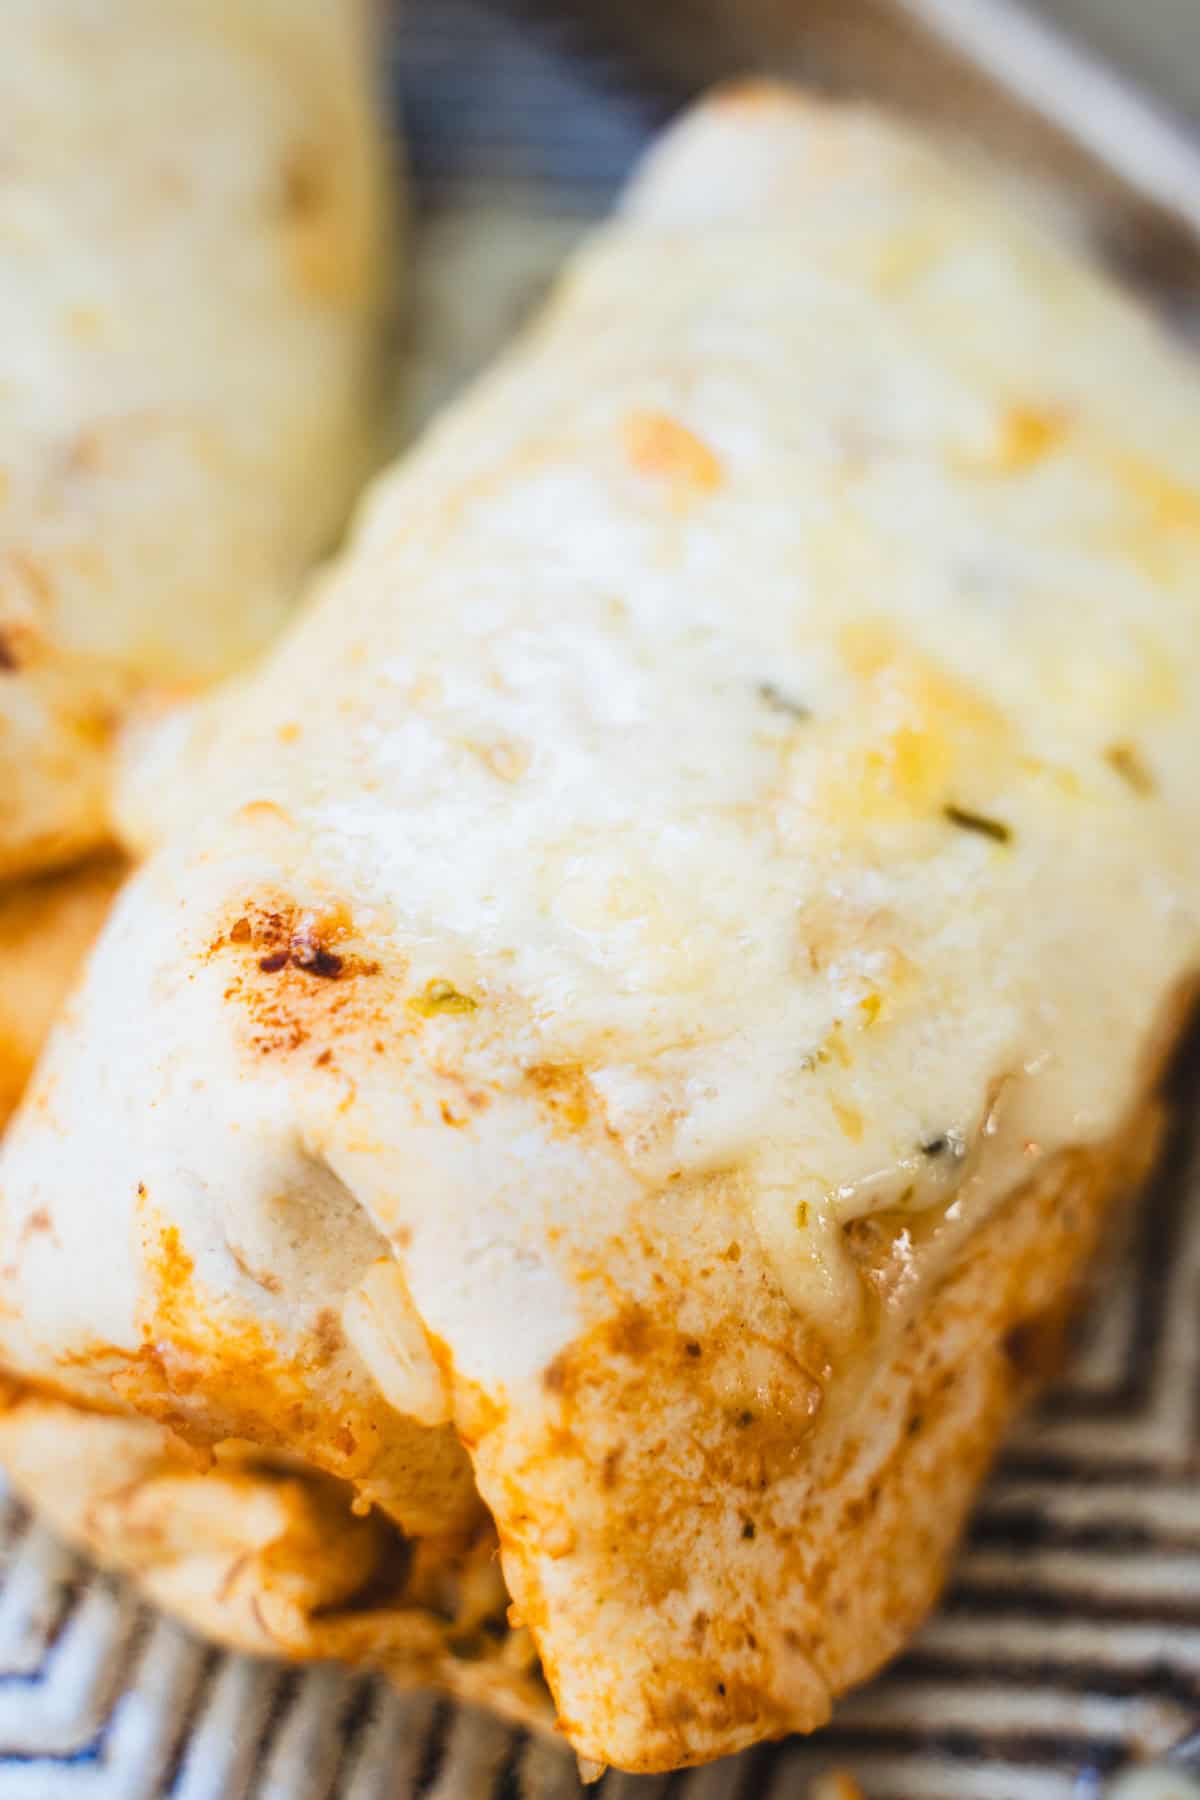
Place each burrito seam-side down on a foil-lined baking sheet (another easy cleanup win). Sprinkle the remaining Monterey Jack over the top, then slide them under the broiler.
Broil for 3 to 5 minutes, just until the cheese is melted, bubbling, and starting to turn golden in spots. Keep an eye on them here-this final step goes fast, but it's what gives you that irresistible baked burrito finish.
Make-Ahead Tips
This is one of those recipes that quietly works in your favor if you plan just a little ahead-especially for a Dinner for Two situation where you don't want to be cooking everything from scratch at 6pm.
You can roast the peppers up to 2 days in advance and keep them tucked away in the fridge. Honestly, this is the step that feels the most "extra" in the moment, so getting it done early makes everything else feel easy.
The bean and chile filling also holds up beautifully. In fact, it almost gets better after sitting because all those spices settle in and deepen. Just store it in the fridge and gently rewarm it in the microwave when you're ready to assemble.
And the best part? You don't have to fully commit ahead of time. You can build everything when the moment feels right-warm the tortillas, assemble the burritos, and bake them fresh so you still get that melty, broiled top right when you want it.
Love this recipe? Please leave a star rating and review in the comments below! And don't forget to subscribe to Our Table 4 2 for even more cooking for two recipes and tips.
Related
Looking for more easy mexican recipes for two? Try these:


Baked Chile Relleno Burrito (Dinner for Two)
Save This Recipe To Your Recipe Box
You can access your saved recipes on this device and generate a shopping list for recipes in your collections.
Ingredients
- 1 cup plus 2 tablespoons vegetable or chicken broth. (or use better than bullion mixed with water)
- ¼ cup long-grain white rice , rinsed
- 3 cloves garlic , minced
- salt
- 2 tablespoons cilantro
- 1 teaspoon rice vinegar or lime juice
- 1 tablespoons vegetable oil
- 1 clove shallot or ½ cup onion, chopped fine
- 1½ tablespoons tomato paste
- 1 teaspoon canned chipotle peppers in Adobo sauce , minced
- 1½ teaspoon ground cumin
- ½ teaspoon dried oregano
- 2 to 3 Anaheim peppers or poblano, halved lengthwise, leaving stems intact and seeds removed
- 1 ½ teaspoons lime juice
- 3 10-inch flour tortillas
- 5 ounces Monterey Jack cheese , shredded (about 1 ¼ cups)
Instructions
Roast the chile peppers
- Move your oven rack so it's about 6 inches below the broiler and let it preheat. Line a baking sheet with foil.Slice your Anaheim peppers in half lengthwise, keeping the stems intact (they make them easier to handle), and remove the seeds. Lay them cut-side down on the baking sheet, then give them a light drizzle of olive oil and a sprinkle of salt and pepper.
- Slide them under the broiler, about 4 to 7 minutes. Until the skin is blistered and charred.Once they're out of the oven, let them cool just enough to handle. Then trim off the stems and gently peel away any loose skin. Don't stress about getting every last bit-just remove what slips off easily and call it good.
Cook the rice
- In a small saucepan, combine the rinsed rice with ½ cup broth. Add garlic cloves and a ¼ teaspoon salt, then bring everything to a boil over medium-high heat.
- Once it's boiling, cover the pot, reduce the heat to low, and let it cook gently until the rice is tender and the liquid is absorbed-about 20 minutes.Take it off the heat and let it sit, still covered, for about 10 minutes. Fluff the rice with a fork and stir in chopped cilantro and a splash of rice vinegar (or lime juice). Cover to keep warm.
Pinto bean burrito filling
- Heat oil in a Dutch oven or heavy-bottomed large saucepan over medium heat until shimmering. Add the shallot and cook until it's just beginning to brown, about 5 minutes. Stir in the tomato paste, chipotle, cumin, oregano, remaining garlic, and a pinch of salt. Cook for a minute or two until everything smells fragrant. Add in your roasted chiles along with a splash of broth. Cover and let everything simmer gently for about 15 minutes
- Using a potato masher, coarsely mash ½ cup of beans and remaining ¼ cup broth. Stir the mashed beans into the pot, being gentle so you don't break up those softened chiles. Let everything cook together, stirring often, until most of the liquid has reduced, about 3 minutes.Turn off the heat and finish with a squeeze of lime juice, then stir in the remaining whole beans. Cover to keep warm.
Fill, Fold, Bake
- Adjust your oven rack so it's about 6 inches from the broiler element and turn on the broiler. Wrap tortillas in a damp dish towel and microwave them for about 1 minute, until warm and pliable. Lay the tortillas out on your counter, placing relleno chiles on top of each tortilla. Spoon a mound of warm rice down the center, followed by the chile-bean filling, then sprinkle about ¼ cup of Monterey Jack over each one. Keep everything closer to the bottom edge so you have room to roll.
- Working one tortilla at a time: Fold the sides in over the filling, then bring the bottom edge up and over, pulling it back slightly to snug everything in tight. Continue rolling forward, keeping it firm as you go-you want a tight burrito, not a loose wrap.
- Place each burrito seam-side down on a foil-lined baking sheet (another easy cleanup win). Sprinkle the remaining Monterey Jack over the top, then slide them under the broiler. Broil for 3 to 5 minutes, just until the cheese is melted, bubbling, and starting to turn golden in spots.
Notes
Your Notes, Tips and Tricks
Nutrition
Nutritional information is only an estimate. The accuracy of the nutritional information for any recipe on this site is not guaranteed.
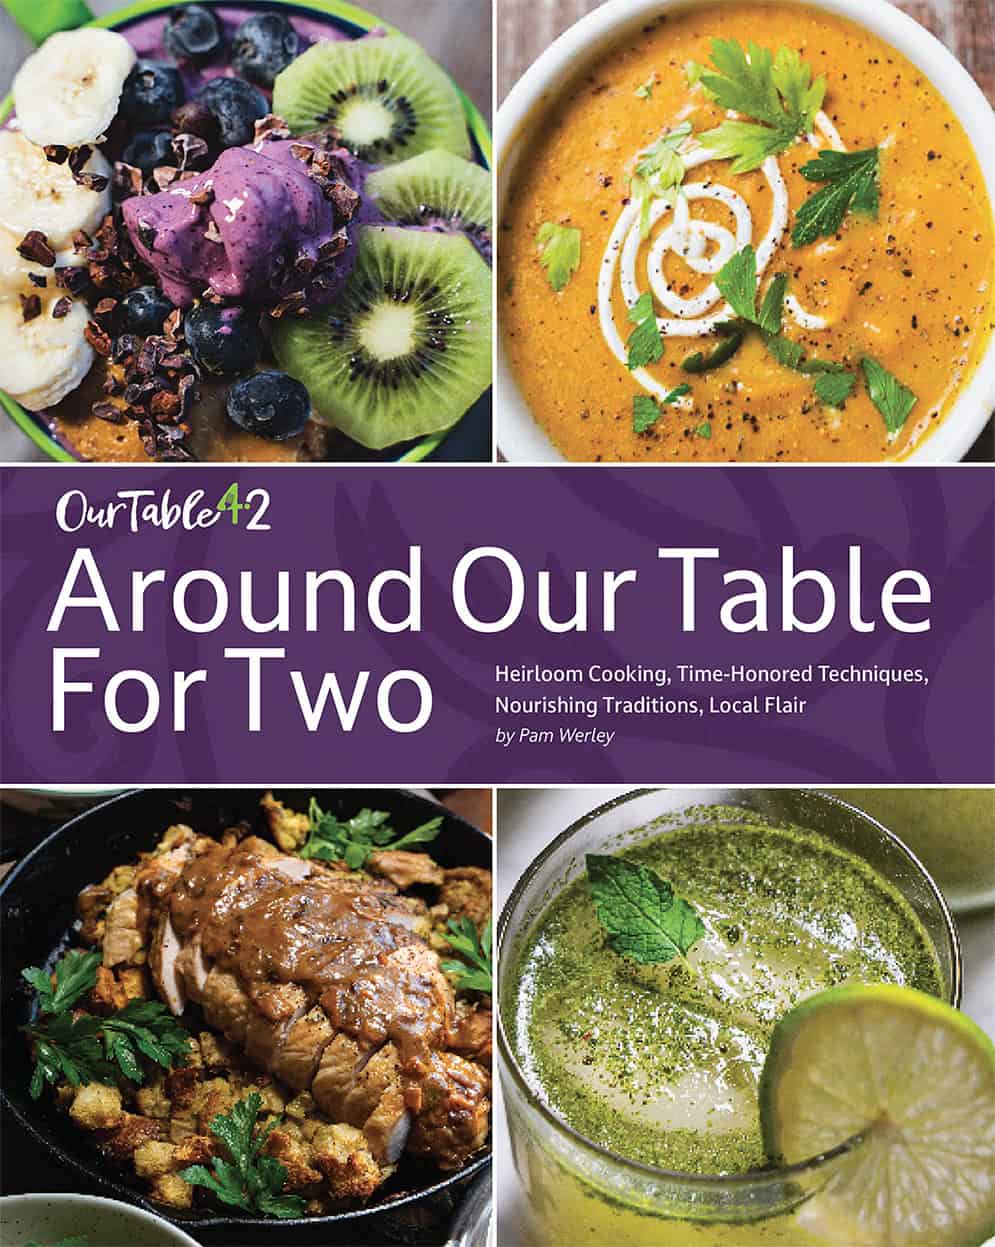
Now shipping!
my new cookbook is here!
Celebrate the joy of heirloom cooking with 130 recipes that reimagine family favorites for today's smaller table.


Leave a Reply